
Explore Mount Meru trekking routes explained in detail, including trail structure, difficulty, and route stages with expert guidance from Nabak Safaris and Tours in Tanzania.
Introduction
Understanding Mount Meru trekking routes explained is the first step to successfully planning a trekking adventure in Tanzania. Located within Arusha National Park, Mount Meru offers one of the most structured and scenic trekking systems in East Africa.
Unlike many other mountains that have multiple complex paths, Mount Meru has a single well-organized trekking route that guides climbers from the base through forest zones, alpine landscapes, and finally to the summit. This makes the concept of Mount Meru trekking routes explained simpler but still rich in experience, as each section of the trail offers unique landscapes and challenges.
This guide by Nabak Safaris and Tours provides a complete breakdown of trekking routes, route structure, stages, and what climbers should expect at every point of the journey.
Quick Summary
- Mount Meru has one main trekking route
- Route passes through forest, moorland, and summit zones
- Duration is typically 3–4 days
- Guided trekking is mandatory
- Route is suitable for intermediate beginners
Why Mount Meru Trekking Routes Are Unique
When studying Mount Meru trekking routes explained, it is important to understand what makes this mountain different.
1. Single Main Route System
Unlike other mountains with multiple paths, Mount Meru uses:
- One official trekking route
- Standardized checkpoints
- Controlled access points
2. Ecological Diversity Along the Route
The route passes through:
- Dense rainforest
- Open grasslands
- Moorland vegetation
- Alpine desert near summit
3. Wildlife Integration
Because the route is inside a national park, trekkers may encounter:
- Giraffes
- Buffalo
- Zebras
- Monkeys
Main Structure of Mount Meru Trekking Routes
Understanding Mount Meru trekking routes explained requires breaking down the route into key sections.
1. Entry Point: Momella Gate
Overview
- Starting point of all treks
- Located at lower altitude
- Entry controlled by park authorities
Experience
- Registration and briefing
- Initial forest walk
- First wildlife sightings
Importance
This marks the official start of Mount Meru trekking routes explained journey.
2. Forest Zone Section
Environment
- Dense rainforest
- High humidity
- Shaded trekking paths
Experience
- Slow hiking pace
- Bird sounds and wildlife movement
- Cool temperatures
3. Mid-Altitude Transition Zone
Environment
- Gradual reduction of forest density
- Open views begin to appear
- Cooler air
Experience
- Increasing elevation challenge
- Scenic landscapes start expanding
- Less wildlife presence
4. High Altitude Zone
Environment
- Moorland vegetation
- Rocky terrain
- Windy conditions
Experience
- Physically demanding section
- Clear panoramic views
- Preparation for summit push
5. Summit Route Section
Environment
- Narrow ridge paths
- Very high altitude
- Cold temperatures
Experience
- Early morning summit attempt
- Sunrise at peak
- View of distant landscapes including Mount Kilimanjaro
Comparison Table: Route Stages
| Route Stage | Environment Type | Difficulty | Key Experience |
|---|---|---|---|
| Momella Gate | Forest entry | Easy | Wildlife start |
| Forest Zone | Dense forest | Moderate | Nature walk |
| Mid Zone | Transition area | Moderate | Scenic views |
| High Zone | Moorland | Hard | Altitude push |
| Summit | Ridge path | Very Hard | Peak experience |
Expert Insight from Nabak Safaris and Tours
Experts confirm that Mount Meru trekking routes explained is best understood as a progressive experience rather than separate paths.
Key insights:
- The route is designed for gradual acclimatization
- Each section prepares climbers for the next level
- Wildlife and scenery change with altitude
- Guided trekking ensures safety and navigation
Field experience shows that climbers who understand the route structure perform better and enjoy the trek more.
Bullet Point Highlights
- One main trekking route system
- Starts at Momella Gate
- Passes through 4 major ecological zones
- Summit reached via ridge path
- Guided trekking is mandatory
This section explains that Mount Meru trekking routes explained is not about multiple complex paths but a single, well-structured journey through diverse ecological zones. Each stage of the route builds experience, endurance, and appreciation for nature.
With professional support from Nabak Safaris and Tours, trekkers can confidently begin their journey knowing exactly what each section of the route involves.
Day-by-Day Route Breakdown & Altitude Progression
To fully understand Mount Meru trekking routes explained, it is important to break down the journey into a clear day-by-day structure. Although Mount Meru has one main trekking route, the experience changes significantly each day due to altitude gain, vegetation shifts, and terrain variation.
Located inside Arusha National Park, the trekking route is carefully designed to ensure gradual acclimatization and safe progression toward the summit. This section by Nabak Safaris and Tours provides a deeply detailed explanation of each trekking day, altitude changes, and what climbers should expect along the route.
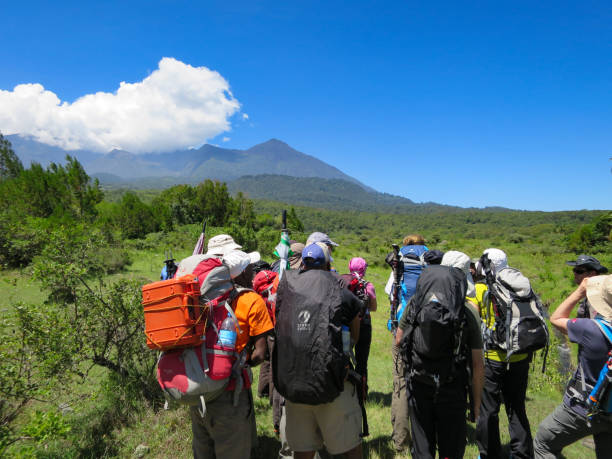
Day 1: Momella Gate to Miriakamba Hut
Altitude Range
- Start: ~1,500m
- End: ~2,500m
Route Experience
This is the first and most important stage of Mount Meru trekking routes explained. The journey begins at Momella Gate, where trekkers register and meet their guides.
The trail starts in open grassland before entering dense rainforest.
Key Highlights
- Wildlife sightings (giraffes, zebras, buffalo at distance)
- Gradual forest entry
- First exposure to mountain trekking
Terrain Description
- Soft forest paths
- Occasional muddy sections
- Gentle slopes
Why This Day Matters
This stage helps trekkers:
- Adapt to walking rhythm
- Experience altitude transition
- Begin physical conditioning
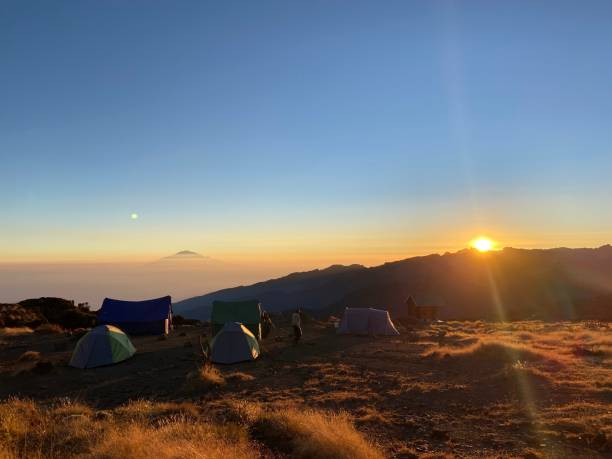
Day 2: Miriakamba Hut to Saddle Hut
Altitude Range
- Start: ~2,500m
- End: ~3,500m
Route Experience
This is a more challenging section of Mount Meru trekking routes explained, as the incline becomes steeper and vegetation changes significantly.
The forest begins to thin out, and trekkers enter moorland zones.
Key Highlights
- Expanding mountain views
- Cooler temperatures
- Transition from forest to alpine vegetation
Terrain Description
- Steeper uphill paths
- Rocky sections
- Wind exposure increases
Optional Acclimatization Hike
- Short hike to Little Meru (~3,820m)
- Helps prepare for summit day
Why This Day Matters
- Builds endurance for summit
- Helps body adjust to altitude
- Mentally prepares trekkers for final ascent
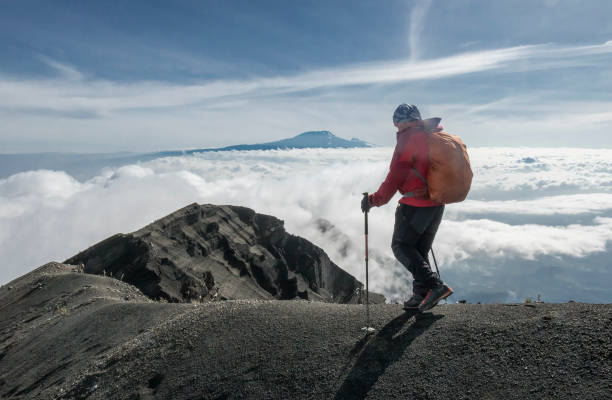
Day 3: Summit Attempt (Saddle Hut to Social Peak)
Altitude Range
- Start: ~3,500m
- Summit: ~4,566m
Route Experience
This is the most demanding part of Mount Meru trekking routes explained. Climbers begin their summit attempt very early (often around midnight) to reach the peak at sunrise.
The route follows a narrow ridge with steep slopes on both sides.
Key Highlights
- Night trekking under stars
- Steep ridge climbing
- Sunrise at summit
Summit Experience
At the top, trekkers enjoy:
- 360-degree panoramic views
- Clear visibility of surrounding landscapes
- On rare clear days, view of Mount Kilimanjaro
Terrain Description
- Rocky ridge path
- Cold temperatures
- High wind exposure
Why This Day Matters
- Ultimate physical and mental challenge
- Peak achievement of the trek
- Most rewarding part of the journey
Descent: Return to Saddle Hut and Miriakamba
After summiting, trekkers descend slowly back down.
Experience
- Fatigue relief after summit
- Easier downhill walking
- Reflection on achievement
Importance of Controlled Descent
- Reduces injury risk
- Allows recovery
- Maintains safety standards
Day 4: Final Descent to Momella Gate
Altitude Range
- From ~2,500m back to ~1,500m
Route Experience
This final stage of Mount Meru trekking routes explained is a relaxed descent through forest zones.
Key Highlights
- Final wildlife sightings
- Return to lush forest environment
- Completion of trekking journey
Terrain Description
- Downhill forest trails
- Mild walking pace
- Soft ground sections
Comparison Table: Daily Route Progression
| Day | Route Section | Altitude Change | Difficulty |
|---|---|---|---|
| Day 1 | Momella → Miriakamba | Moderate ascent | Easy |
| Day 2 | Miriakamba → Saddle Hut | Steep ascent | Moderate |
| Day 3 | Summit + descent | Very high | Hard |
| Day 4 | Descent to gate | Downhill | Easy |
Expert Insight from Nabak Safaris and Tours
Experts emphasize that Mount Meru trekking routes explained is best understood as a progressive altitude system designed for safe acclimatization.
Key insights:
- Each day prepares the body for higher elevation
- Summit success depends on pacing and rest
- Guides play a critical role in navigation and safety
- Weather conditions influence timing of summit attempt
Field experience shows that trekkers who follow the daily structure closely have higher summit success rates and better overall experience.
Bullet Point Highlights
- 4-day structured trekking route
- Gradual altitude increase system
- Summit reached on Day 3
- Forest, moorland, and alpine zones included
- Guided trekking ensures safety
This section clearly shows that Mount Meru trekking routes explained is a carefully designed multi-day journey. Each day has a specific purpose—from acclimatization in the forest to the challenging summit push and final descent.
With expert guidance from Nabak Safaris and Tours, trekkers can confidently navigate each stage of the route and fully enjoy the adventure.
Packing Guide, Safety Rules, Weather Conditions & Common Mistakes
Understanding Mount Meru trekking routes explained is not complete without knowing how to prepare properly for the journey. Even though Mount Meru has a well-structured and guided trekking system inside Arusha National Park, many first-time trekkers underestimate the importance of packing, weather readiness, and safety discipline.
This section by Nabak Safaris and Tours provides a deeply detailed guide on what to pack, how to handle changing weather, essential safety rules, and common mistakes that can affect your trekking experience.
1. Essential Packing Guide for Mount Meru Trekking Routes
Proper packing is critical when following Mount Meru trekking routes explained, because conditions change with altitude.
A. Clothing System (Layering Method)
Mount Meru experiences different climate zones along the route.
Base Layer
- Moisture-wicking t-shirts
- Lightweight thermal tops
- Quick-dry underwear
Mid Layer
- Fleece jacket
- Warm sweater
- Insulating clothing for cold nights
Outer Layer
- Waterproof jacket
- Windproof shell
- Rain protection gear
Why Layering Is Important
Because temperatures vary dramatically between forest and summit zones, layering ensures flexibility and comfort throughout Mount Meru trekking routes explained.
2. Footwear & Trekking Equipment
Proper footwear is essential for safe movement along the trekking route.
Recommended Footwear
- Waterproof hiking boots
- Strong ankle support
- Good grip soles for rocky terrain
Additional Equipment
- Trekking poles (highly recommended)
- Gloves for summit night
- Warm hat or beanie
- Sunglasses for sun protection
Why It Matters
Good equipment helps reduce:
- Slips on muddy trails
- Foot fatigue
- Injuries during descent
3. Sleeping Gear & Camping Comfort
Even though huts are available on the route, comfort still depends on preparation.
Essential Sleeping Items
- Warm sleeping bag (cold-rated)
- Sleeping liner
- Optional travel pillow
Night Conditions
At higher points in Mount Meru trekking routes explained:
- Temperatures drop significantly
- Wind becomes stronger
- Nights are very cold at Saddle Hut
4. Weather Conditions Along the Route
Weather plays a major role in trekking success.
A. Forest Zone Weather
- Humid and mild
- Frequent mist
- Occasional rain
B. Moorland Zone Weather
- Cooler temperatures
- Strong winds
- Clearer skies
C. Summit Zone Weather
- Very cold conditions
- Possible frost
- Strong wind exposure
Why Weather Awareness Is Important
Understanding weather helps trekkers:
- Pack correctly
- Plan clothing layers
- Avoid discomfort during summit night
5. Safety Rules on Mount Meru Trekking Routes
Safety is strictly enforced throughout Mount Meru trekking routes explained.
A. Wildlife Safety Rules
- Never feed animals
- Maintain safe distance
- Follow ranger instructions
B. Trail Discipline
- Stay on marked paths
- Do not hike alone
- Always follow guide directions
C. Health Safety
- Drink enough water
- Report altitude sickness early
- Take breaks when needed
Why Safety Is High Priority
Because the route passes through a national park, professional rangers actively monitor all trekking activities.
6. Common Mistakes First-Time Trekkers Make
Avoiding mistakes is key to success in Mount Meru trekking routes explained.
Mistake 1: Overpacking
- Carrying unnecessary items
- Increasing fatigue
Mistake 2: Poor Footwear
- New or uncomfortable shoes
- Lack of ankle support
Mistake 3: Ignoring Weather Changes
- No rain gear
- Underestimating cold nights
Mistake 4: Walking Too Fast
- Leads to exhaustion
- Increases altitude strain
Mistake 5: Not Drinking Enough Water
- Causes fatigue
- Increases altitude sickness risk
Comparison Table: Prepared vs Unprepared Trekker
| Factor | Prepared Trekker | Unprepared Trekker |
|---|---|---|
| Comfort | High | Low |
| Energy | Stable | Weak |
| Safety | High | Risky |
| Experience | Enjoyable | Stressful |
Expert Insight from Nabak Safaris and Tours
Experts confirm that success in Mount Meru trekking routes explained depends more on preparation than physical strength.
Key insights:
- Proper gear improves endurance
- Layering helps manage temperature changes
- Hydration reduces altitude effects
- Following guides ensures safety and efficiency
Field experience shows that well-prepared trekkers enjoy the journey significantly more and complete the trek successfully.
Bullet Point Highlights
- Layered clothing is essential
- Weather changes by altitude
- Proper footwear is critical
- Safety rules are strictly enforced
- Preparation increases success rate
This section highlights that preparation is a key part of understanding Mount Meru trekking routes explained. From packing and clothing to weather awareness and safety rules, every detail affects the trekking experience.
With expert support from Nabak Safaris and Tours, trekkers can confidently prepare for Mount Meru and enjoy a safe, well-organized adventure.
Final Summary, FAQs, Expert Insights & Complete Trekking Guide

After exploring route structure, daily trekking stages, packing requirements, and safety guidelines, it is clear that Mount Meru trekking routes explained provides one of the most well-organized mountain trekking experiences in Africa.
Located within Arusha National Park, Mount Meru offers a structured, scenic, and guided trekking system that is ideal for both intermediate and first-time climbers seeking a real mountain adventure.
This final section by Nabak Safaris and Tours brings everything together into a complete expert guide, including FAQs, comparison insights, final recommendations, and practical advice.
Final Expert Summary
Understanding Mount Meru trekking routes explained means recognizing that the mountain is designed as a progressive experience rather than multiple separate trails.
Key Summary Points
- One main trekking route with structured stages
- Gradual altitude gain from forest to summit
- Strong focus on acclimatization
- Guided trekking is mandatory
- Wildlife and scenery change throughout the route
Why Mount Meru Trekking Routes Are Special
The trekking system of Mount Meru trekking routes explained stands out for several reasons:
1. Progressive Altitude Design
Each stage is designed to prepare the body for the next level, reducing altitude risks.
2. Ecological Diversity
Trekkers experience:
- Dense rainforest
- Open moorlands
- Alpine desert zones
3. Wildlife Integration
Unlike many mountains, this route passes through a national park where wildlife can be seen safely at distance.
4. Structured Safety System
Rangers and guides ensure controlled movement along the entire route.
Comparison Table: Mount Meru vs Other Trekking Routes
| Feature | Mount Meru Trekking Routes | Other Mountain Routes |
|---|---|---|
| Route Structure | Single, organized route | Multiple variations |
| Wildlife Exposure | High | Low |
| Difficulty Level | Moderate | Varies |
| Safety System | Highly controlled | Less structured |
| Scenic Variety | Very high | Moderate |
Extended FAQs
1. How many trekking routes are on Mount Meru?
There is one main official route that all climbers follow.
2. Is Mount Meru suitable for beginners?
Yes, Mount Meru trekking routes explained shows it is suitable for fit beginners with guided support.
3. How long does the trek take?
Typically 3–4 days depending on pace and itinerary.
4. Do I need technical climbing skills?
No technical climbing is required, only trekking fitness.
5. Can I see wildlife during the trek?
Yes, especially in lower forest sections inside Arusha National Park.
Expert Insight from Nabak Safaris and Tours
Experts emphasize that understanding Mount Meru trekking routes explained helps trekkers mentally and physically prepare for success.
Key insights:
- Route simplicity improves safety and navigation
- Gradual altitude gain reduces risk of sickness
- Guided trekking enhances experience quality
- Preparation determines overall success
Field experience shows that trekkers who fully understand the route structure enjoy the journey more and reach the summit with greater confidence.
Bullet Point Summary
- One structured trekking route system
- Four main ecological zones
- Gradual altitude progression
- Wildlife-rich environment
- Guided trekking required
Final Safety Reminder
Even with a well-designed route:
- Always follow guide instructions
- Respect wildlife distance rules
- Maintain steady pacing
- Stay hydrated throughout the trek
- Be prepared for changing weather
Final Conclusion
Mount Meru trekking routes explained reveals a carefully structured mountain experience designed for safety, progression, and scenic diversity. From forest entry points to high-altitude summit ridges, every stage is planned to create a balanced and rewarding adventure.
With professional guidance from Nabak Safaris and Tours, trekkers can confidently explore Mount Meru knowing the route is safe, well-organized, and full of unforgettable scenery.
Ready to explore Mount Meru?
👉 Book your guided trekking experience with Nabak Safaris and Tours and discover the complete Mount Meru trekking routes explained journey with expert support and unforgettable scenery.